Electronics designers often opt to build a prototype of their project using an Arduino circuit board. However, when it comes to the final production, they may be uncertain whether to use the fully developed Arduino circuit board or a custom board. It is important to consider the advantages and disadvantages of each option.
If starting from scratch, designing and building a custom circuit board can be a complex and time-consuming process. In contrast, the Arduino circuit board provides a ready-made solution that can significantly simplify the development process for a prototype.
What is Arduino ?
Arduino is an open-source platform that comprises a programmable microcontroller board and an Integrated Development Environment (IDE) software application. The platform enables designers, artists, hobbyists, and other enthusiasts to design and construct interactive projects with ease. The IDE software runs on a computer and facilitates the writing and uploading of code to the PCB via a USB cable.
The Arduino hardware and software are ideal for individuals interested in developing and prototyping interactive projects, as the boards can seamlessly interact with a wide range of components, including motors, buttons, speakers, LEDs, switches, cameras, and more. The platform finds extensive use in robotics and audio systems, among other applications, where code-based control is paramount.
The Arduino code is derived from the C++ programming language and is designed to be user-friendly, making it an attractive option for beginners and those with limited programming experience. With its user-friendly features and extensive capabilities, the Arduino PCB is a highly versatile and accessible platform that continues to gain popularity among enthusiasts, hobbyists, and professionals alike.
What is Arduino PCB ?
Arduino PCBs are capable of reading inputs such as button presses or Twitter messages and converting them into outputs, such as activating a motor. Users can send instructions to the microcontroller board, dictating its actions and behaviors.
The popularity of Arduino PCBs has grown in response to the increasing demands of the electronics industry. Unlike other programmable boards, the Arduino does not require a separate piece of hardware to input new code onto the board. Additionally, the Arduino software, known as the Integrated Development Environment, is based on a version of C++ that is easy to learn and program.
Arduino also offers a standard form factor that simplifies the microcontroller’s functions into a more accessible package. Arduino PCBs are reliable and can be used to design digital devices with sensors and control systems, whether the devices are simple or complex.
The Arduino was specifically developed to provide non-engineers with access to low-cost, easy-to-use tools for developing hardware projects. The board is launched under a Creative Commons license, allowing people to design their own boards and contribute to the platform’s ongoing development and innovation.
Types of Custom Arduino PCB
There are several types of custom Arduino PCBs that can be designed and fabricated, depending on the specific project requirements. Here are some examples:
Shield PCB
This is the most common type of custom Arduino PCB. It is designed to fit directly onto an Arduino board and extends its functionality by adding additional components such as sensors, motors, or displays.
Standalone PCB
This type of PCB is designed to function independently of an Arduino board. It includes an Atmel AVR microcontroller and all the necessary components to make it operational, such as power regulation, clock circuitry, and input/output pins.
Mini PCB
This is a smaller version of the Arduino board that is intended for use in space-constrained applications. It includes only the essential components required for operation, such as the microcontroller, power regulation, and input/output pins.
Custom Shield PCB
This type of PCB is designed to meet specific project requirements that cannot be met by off-the-shelf Arduino shields. It may include a combination of sensors, actuators, and other electronic components that are unique to the project.
Wireless PCB
This type of PCB includes a wireless communication module, such as Bluetooth or Wi-Fi, in addition to the microcontroller and other components. It allows the Arduino board to communicate wirelessly with other devices or the internet.
Power PCB
This type of PCB is designed to provide power to the Arduino board and other connected components. It may include a battery charging circuit, voltage regulators, and protection circuitry to ensure safe and reliable operation.
Sensor PCB
This type of PCB is designed to interface with specific sensors or sensor arrays. It may include signal conditioning circuitry and other components required to interface with the sensor and convert its output into a usable signal for the microcontroller.
How to Choose the Right Arduino Board ?
Choosing the right Arduino board can depend on a number of factors, such as the complexity of your project, the number and types of inputs and outputs required, and your budget. Here are some general guidelines to help you choose the right Arduino board for your project:
Determine your project requirements: Consider the requirements of your project, such as the number of analog inputs, digital inputs and outputs, memory, and processing power needed.
Identify the form factor: Arduino boards come in different form factors, such as the classic Uno form factor, or smaller, more compact form factors like the Nano or Micro. Choose a board that fits your project’s size and form factor requirements.
Consider connectivity options: Some Arduino boards have built-in WiFi or Bluetooth connectivity, while others require additional components or shields to connect to the internet or other devices. Choose a board with the connectivity options that meet your project requirements.
Evaluate power requirements: Consider the power requirements of your project, such as the voltage and current needed to drive your components. Choose a board that can handle the power requirements of your project.
Look at the available software libraries: Arduino boards are supported by a vast library of software code, called “sketches,” which can be used to program the board. Check to see if the board you are considering has the required libraries for your project.
Consider budget: Arduino boards come at different price points, so consider your budget when choosing a board. Some boards may have additional features that you do not need, so avoid overspending on features you will not use.
Overall, choosing the right Arduino board requires careful consideration of your project requirements, form factor, connectivity options, power requirements, software libraries, and budget. By taking these factors into account, you can choose the board that best meets your needs and helps you achieve your project goals.
How to Design a Custom Arduino PCB ?
Designing a custom Arduino PCB involves several steps. Here are the general steps involved in designing a custom Arduino PCB:
1. Define the Specifications: The first step in designing a custom Arduino PCB is to define the specifications. This includes determining the required functionality, the number of pins required, the size of the board, and any other relevant design requirements.
2. Choose the Microcontroller: Once the specifications are defined, the next step is to choose the microcontroller for the board. The microcontroller is the brain of the board and determines its capabilities. Popular microcontrollers used in Arduino PCBs include the Atmel AVR and the ARM Cortex-M series.
3. Determine the Pinout: The pinout of the Arduino PCB is critical to its functionality. It determines which pins are used for input and output, power, and communication. The pinout should be compatible with the Arduino IDE and any libraries used in the design.
4. Create the Schematic: The schematic is a graphical representation of the circuit design. It shows how the components are connected and how the board will function. The schematic can be created using EDA software, such as Eagle or KiCAD.
5. Design the PCB Layout: The PCB layout is the physical design of the board. It shows the exact placement of the components and traces on the board. The layout should be optimized for size, cost, and functionality.
6. Generate the Gerber Files: The Gerber files are a set of files that define the layout of the PCB and are used by the manufacturer to fabricate the board. The Gerber files should be generated using the EDA software and should be checked for errors before sending them to the manufacturer.
7. Prototype and Test: Once the PCB is fabricated, it should be tested to ensure that it functions correctly. Any errors or issues should be addressed before the final version is produced.
8. Fabricate the Final PCB: Once the prototype is tested and any issues are addressed, the final version of the PCB can be fabricated. The PCB can be fabricated using a variety of methods, including etching, milling, or ordering from a manufacturer.
Overall, designing a custom Arduino PCB requires careful planning, attention to detail, and knowledge of electronics and circuit design. With the right tools and resources, anyone can create custom Arduino PCBs that meet their project requirements.
Designing an Arduino Shield Circuit Board: Key Considerations
In the process of designing an Arduino shield circuit board, one critical but often overlooked step is obtaining the structural dimensions of the shield and connector pinouts. While it may be tempting to skip this step and dive straight into the layout process, doing so can lead to improper placement of connections on the pins. Therefore, it is essential to obtain the linking pinouts early on in the design process.
Once the schematic capture is complete and you are ready to create the layout, it is crucial to ensure that the circuit board dimensions match the thickness of an Arduino base circuit board. While Arduino shields may come in different dimensions, the width must align with the necessary pins on the primary Arduino board. It is recommended to cover the entire circuit board to ensure stability when attached to a baseboard.
When creating the circuitry and diagrams for your circuit board, it is best to use a professional circuit designer and incorporate your components. The most critical components required are the pin strips, which facilitate the connection between your personalized Arduino shield and the Arduino board. By following these steps, you can ensure a well-designed and functional Arduino shield circuit board.
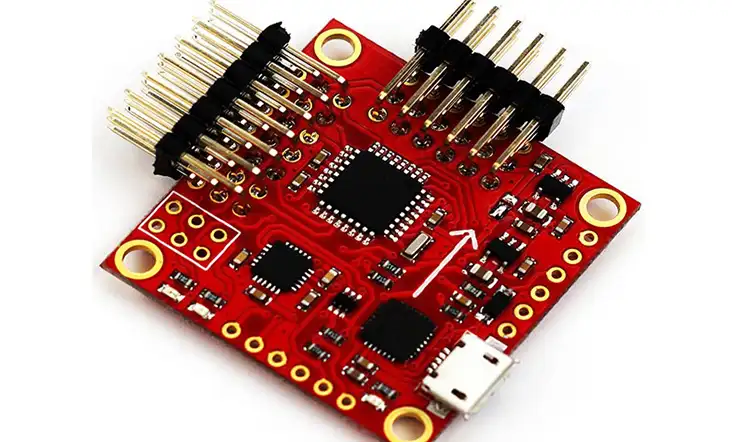
Pin Headers
When designing an Arduino shield circuit board, it is important to select the appropriate pin strips with a 2.54-millimeter pitch for compatibility with Arduino baseboards. The pin header serves as an interface between the Arduino base board and the customized shield board.
There are two options for choosing the pin strip for the shield circuit board. The first option is a male pin header with pins on every side, allowing for easy connection of pins with jumpers. The second option is a downward-facing pin header that connects to the board when the upward-facing holes accept axial element leads. This version allows for stacking of another shield circuit board on top if desired.
Once the pin connector has been selected, it is necessary to create or find schematic symbols that can be used for the pin header in the circuit designer. The selected symbol must correspond with the pinout of the Arduino board, and it is important to monitor the side of the circuit board where each pin connector will be positioned. By following these steps, you can ensure proper connectivity between the Arduino base board and the customized shield board.
Types of Pins on the Custom Arduino PCB
The pins on a custom Arduino PCB can be categorized into different types based on their functionality. Here are some common types of pins that are found on Arduino boards:
Digital Pins: These pins can be used for digital input or output. They can be configured as either input or output pins in software and can be used to interface with switches, LEDs, relays, and other digital devices.
Analog Pins: These pins can be used for analog input. They are capable of measuring the voltage level on an analog input signal and converting it into a digital value that can be read by the microcontroller. They are typically used to interface with sensors such as temperature sensors, light sensors, and potentiometers.
Power Pins: These pins are used to supply power to the Arduino board and other connected components. They typically include pins for connecting a power source, such as a battery or power supply, as well as pins for regulating and distributing power to other components on the board.
Ground Pins: These pins are used as the electrical reference point for the board and other connected components. They provide a common ground connection for all components on the board.
Communication Pins: These pins are used for serial communication with other devices. They include pins for UART, SPI, and I2C communication protocols.
Reset Pin: This pin is used to reset the microcontroller. It is typically connected to a push-button switch that can be used to reset the board.
Programming Pins: These pins are used for programming the microcontroller. They include pins for connecting a programmer or USB-to-serial converter to the board.
The exact number and arrangement of pins on a custom Arduino PCB will depend on the specific design requirements and the microcontroller used.
Designing Shield Circuit Boards with Customizable Circuits and Components
Once the base board has been identified and a layout plan has been created, the next crucial step in designing a shield circuit board is to carefully select and incorporate circuits and components that are suitable for the intended purpose. Theoretically, any component can be added to the shield circuit board as long as it fits within the designated space.
In addition, we have extensive experience in designing industrial shield circuits for Arduino that can accommodate relays and support 120-240 Alternating Current power, as well as simpler digital circuit boards that feature interfaces for multiple sensors. We take pride in our ability to customize our designs to meet the specific needs of our clients, and the potential for customization in this field is immense.
Power: In order to power the Arduino shield board and its connected devices, an external power source such as AC, 12V DC, or 24V DC may be necessary. Alternatively, power can be supplied through the 5V pin, although incorporating a regulator such as a switching converter or LDO may be required to ensure stable and consistent power delivery.
Connectors: Screw connectors provide a practical and reliable solution for establishing secure mechanical connections with external wired devices. An alternative option is to use pin strips on a shield circuit board to establish the connections.
LEDs, buttons, and switches: LEDs are highly versatile and can serve as effective indicator lights, whether to display logical states or to indicate the status of toggle switches. These circuits can activate logic states on General Purpose Input/Output or on the circuits of the shield circuit board.
Specialized ASICs: There are numerous ASICs available for a wide range of electrical operations. Integrating them into a personalized Arduino shield is a straightforward process, as they typically establish a connection through SPI/I2C, and configuring them for the desired application is hassle-free.
To achieve a reconfigurable circuit board, a perf board with a hole array can be incorporated into the Arduino design. This emulates the functionality of a breadboard and provides a certain degree of flexibility in the layout.
Types of Custom Arduino PCB Shields
There are many types of custom Arduino PCB shields that can be designed and fabricated to extend the functionality of an Arduino board. Here are some common types of shields:
Sensor Shield: This shield is designed to interface with a range of sensors, including temperature, humidity, light, and motion sensors. It typically includes a variety of analog and digital input pins, as well as power and ground pins.
Motor Shield: This shield is designed to control DC motors, stepper motors, and servo motors. It includes built-in H-bridge circuits that can handle the high current and voltage requirements of motors, as well as additional pins for controlling the motors.
Wireless Shield: This shield is designed to provide wireless connectivity to an Arduino board. It may include a Wi-Fi or Bluetooth module, as well as additional circuitry for interfacing with the wireless module.
LCD Shield: This shield is designed to interface with a range of LCD displays, including character displays and graphical displays. It includes a built-in interface for controlling the display, as well as additional pins for connecting other components.
Ethernet Shield: This shield is designed to provide Ethernet connectivity to an Arduino board. It includes a built-in Ethernet controller and RJ45 connector, as well as additional pins for interfacing with the Ethernet controller.
Audio Shield: This shield is designed to play audio files and control volume levels. It includes a built-in audio amplifier, as well as additional pins for connecting speakers, microphones, and other audio components.
Relay Shield: This shield is designed to control high-power devices, such as lights, motors, and solenoids. It includes built-in relays that can handle high current and voltage requirements, as well as additional pins for interfacing with the relays.
The exact number and arrangement of pins and components on a custom Arduino PCB shield will depend on the specific design requirements and the functionality of the shield.
Examples of Arduino PCB Projects
There are countless Arduino PCB projects that can be created, ranging from simple projects to complex ones. Here are some examples of Arduino PCB projects:
Temperature and Humidity Sensor: This project involves creating a custom Arduino PCB shield that can measure temperature and humidity levels using a DHT11 sensor. The data can be displayed on an LCD screen or sent wirelessly to a computer for monitoring.
Smart Home Automation: This project involves creating a custom Arduino PCB shield that can control lights, fans, and other appliances in a home automation system. The shield can be controlled using a smartphone app or a web interface.
Motion-Activated Camera: This project involves creating a custom Arduino PCB shield that can trigger a camera to take a photo or record a video when a motion sensor detects movement. The data can be stored on an SD card or sent wirelessly to a computer for storage.
GPS Tracker: This project involves creating a custom Arduino PCB shield that can track the location of a vehicle or person using a GPS module. The location data can be displayed on an LCD screen or sent wirelessly to a computer for monitoring.
Weather Station: This project involves creating a custom Arduino PCB shield that can measure temperature, humidity, pressure, and other weather parameters using a range of sensors. The data can be displayed on an LCD screen or sent wirelessly to a computer for monitoring.
Robotics Projects: Arduino PCBs can be used to control the movements and behavior of robots. Examples include robot arms, mobile robots, and drones.
Music Projects: Arduino PCBs can be used to create musical instruments, synthesizers, and other audio projects. Examples include MIDI controllers, guitar pedals, and drum machines.
These are just a few examples of the many Arduino PCB projects that can be created. The possibilities are endless, limited only by the creativity and imagination of the designer.
Programming Process of Arduino PCB
Programming an Arduino PCB involves writing code to control the behavior of the microcontroller on the board. Here are the steps involved in programming an Arduino PCB:
1. Install the Arduino IDE: The Arduino Integrated Development Environment (IDE) is the software used to write and upload code to the Arduino board. It can be downloaded for free from the Arduino website.
2. Connect the Arduino PCB to the computer: The Arduino PCB can be connected to the computer using a USB cable. Once connected, the Arduino IDE will detect the board and allow it to be selected as the target for programming.
3. Write the code: The code for the Arduino PCB can be written in the Arduino IDE using the C++ programming language. The code should include the appropriate libraries for any sensors or other components connected to the board.
4. Verify and Upload the Code: Once the code is written, it can be verified for errors using the “Verify” button in the Arduino IDE. If there are no errors, the code can be uploaded to the Arduino PCB using the “Upload” button.
5. Test the code: After the code is uploaded, the Arduino PCB can be disconnected from the computer and connected to any external components as needed. The behavior of the PCB can be tested to ensure that the code is working correctly.
6. Refine the code: If necessary, the code can be refined and updated to improve the performance or functionality of the Arduino PCB.
Overall, programming an Arduino PCB requires a basic understanding of programming concepts and the ability to write code in the C++ programming language. With the right tools and resources, even beginners can create custom Arduino PCBs and program them to perform a wide range of tasks.
Advantages of Arduino PCB
Arduino PCBs (printed circuit boards) have several advantages that make them a popular choice for electronics hobbyists and professionals alike. Here are some of the key advantages:
Easy to use: Arduino PCBs are designed to be beginner-friendly, with a simple layout that makes it easy to connect components and program the board.
Low cost: Arduino PCBs are relatively inexpensive compared to other types of PCBs, making them an affordable option for hobbyists and small-scale projects.
Versatile: Arduino PCBs can be used for a wide range of applications, from simple projects like LED lighting to more complex projects like robotics and IoT devices.
Open source: The Arduino platform is open source, meaning that the design files and software are freely available for anyone to use, modify, and distribute.
Large community: The Arduino community is large and active, with a wealth of resources and support available online. This makes it easy to find help and inspiration for your projects.
Expandable: Arduino PCBs can be expanded with additional shields, which are add-on boards that provide additional functionality, such as wireless communication, motor control, and sensor inputs.
Cross-platform compatibility: Arduino PCBs can be programmed using a variety of programming languages and development environments, making them compatible with a wide range of operating systems and devices.
Conclusion
Arduino PCBs have revolutionized the world of DIY electronics by providing an easy-to-use platform for creating custom electronic projects. With the help of Arduino PCBs, hobbyists and professionals alike can create a wide range of projects, from simple temperature sensors to complex robotic systems.
In addition, advancements in PCB fabrication technology are making it easier and more affordable to create custom PCBs at home or through online services. This means that anyone with an idea and the right tools can create a custom Arduino PCB to bring their project to life.
Related Posts:
1. Everything You Should to Know on Altium PCB Design Software
2. Which One Are the Best Auto-route PCB Software?
3. PCB Traces: The Critical Role of Traces in PCB Design and Manufacturing
4. ExpressPCB Design Tool: A Comprehensive Guide to Using ExpressPCB
5. Avoid These 5 Common PCB Design Mistakes
6. You Need to know the PCB Design Software: Eagle PCB
7. Kicad PCB: How to Understand It?
8. What Is the Difference Between Altium and Eagle?
10. EDA Design Software: Definition, Kinds and Important